Instructions
Plarn mats
What don’t we need? Plastic bags. While we appreciate your willingness to help create these mats with plastic bag donations – we are at capacity for bags. We are asking for plarn balls… and finished plarn mats ready for donation.
What is a plarn mat? It’s a sleeping mat made from the plastic bags you might get from your grocery store or drug store. The bags are cut up, tied together, and balled into plastic yarn (plarn). The plarn is then crocheted into a reusable, waterproof sleeping mat. Check out these instructions… and this video tutorial to make plarn. To make the mat – check out this video and fast forward to about 7 minutes.
Plarn
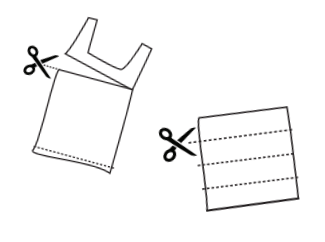
- Start by organizing the bags. Straighten out each
bag by pulling at the end and the handles, so that
it becomes as nice, smooth and flat as the plastic
bag in the picture. Stack up to 4 bags and cut off
the plastic bag handles and the bottom of the bag. - Now, for a plastic grocery bag that’s standard in
size and in thickness, cut each bag into 4 rings. - Loop these rings together, so that you will have one
long plastic chain. Roll the plastic chain into a ball.
Crocheting a Plarn Mat
- You’ll need a crochet hook size 10 or above. If you get a really large crochet
hook, you will find that it’s easier to crochet looser, making the mat more
cushiony, and making it more comfortable to crochet with the plastic. - MAT CROCHET PATTERN: Set-up: ch 42. This is the width of your mat (minus 2
st), and should be approximately 2 1/2 feet-wide. - Row 1: sc into the 40th st, and sc all the way across. ch 2. Turn over work.
Now, check that your mat is indeed about 2.5 feet wide. - Row 2 – 6ft worth of rows : repeat row 1 until your mat is approximately 6 feet-
long mat. inches in length. - Cast off.
Plarn mat Tips & Tricks
- If you have thicker plastic bags, cut smaller strips.
- You can use any kind of plastic bag, even from your dry cleaners.
- If designs matter to you, then sort plastic bags right away by color.
- If you don’t know how to crochet, check out THIS VIDEO – and fast forward to 7 minutes.
No Sew Blankets
Winter is the perfect time of year to snuggle up against the cold weather with a warm and snuggly blanket. These blankets are simple to make, yet effective at keeping the cold away while offering comfort to those who might be struggling.
No sew blankets are easy to make and only require a few tools – which you probably already own! All you need is two pieces of fleece, cut into even squares or rectangles, depending on the shape you are hoping to achieve. Simply cut horizontal slits into the edge of the fleece, and tie the two pieces of fleece together. For more detailed instructions check out this video on Youtube!
Buy your Fleece
- You can buy fleece from any store that sells fabric – we like to purchase from Walmart because it’s usually the most cost-effective. You will need to purchase two pieces of fleece. Fleece is sold 60 inches wide – but you can make it as long as you want! A word of caution – the blanket will be 10 inches smaller when it’s finished – so 60 inches wide is actually 50 inches wide!
Line up your Fabric
Line up the edges of your two pieces of fleece with the front sides OUT. Anti-pill solids are FUZZY on the correct side. Prints with anti-pill fleece will show a clearer image on the front side. Regular fleece Anti-pill prints will be more distinct on the front side. Regular fleece just use the side that appeals to you.
